本記事は、マルチプラットフォーム開発のSDK【Flutter】を用いたモバイルアプリ開発入門の為の記事です。
 ダーフク
ダーフクFlutterでは様々なWidgetを使います。そして、スマートフォンも大小様々あるため、各デバイスに適した大きさにWidgetを調整する必要があります。ConstrainedBoxは、このサイズ調整を行うのに適したWidgetとなります。本記事ではこのWidgetについて、例を交えながら説明をしていきます。
利用方法
ConstrainedBoxは、BoxConstrainsクラスとともに使うことでWidgetのサイズ調整ができる、とても便利なWidgetです。
ConstrainedBox(
  constraints: BoxConstraints(
    minHeight: 10.0,
    maxWidth: 50.0,
  ),
  child: Container(
    color: Colors.grey,
   ),
),
BoxConstrainsクラスのコンストラクター
デフォルトコンストラクター
BoxConstrainsのデフォルトコンストラクターには、
- minHeight
- minWidth
- maxHeight
- maxWidth
の4種類の名前付き引数を設定できます。
名前付きコンストラクター
名前つきコンストラクターは、全部で5種類あります。
- expand
- loose
- tight
- tightFor
- tightForFinite
Constrainted.expand
expandはheight, widthを設定できます。
指定したプロパティはその長さで固定され、未指定のプロパティはできる限り広がります。
以下の例は、【高さのみ指定した場合】、【高さ・横幅も指定した場合】です。
Text(".expand 高さのみ指定"),
ConstrainedBox(
  constraints: BoxConstraints.expand(height: 30.0),
  child: Container(
    color: Colors.grey,
  ),
),

Text(".expand 高さ・横幅も指定"),
ConstrainedBox(
  constraints: BoxConstraints.expand(height: 30.0, width: 100.0),
  child: Container(
    color: Colors.grey,
  ),
),
Constrains.loose
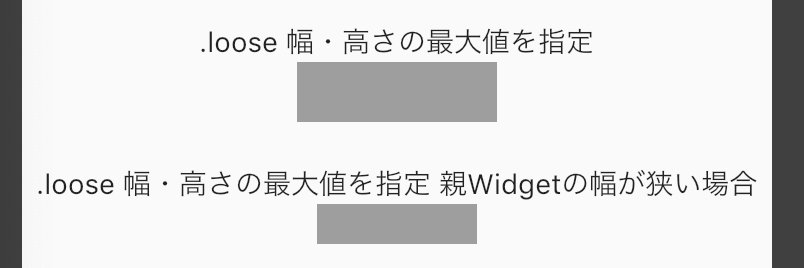
looseは、最大値を指定することができます。
もし、その最大値よりも親Widgetが小さい場合はサイズがマックス【0.0】まで小さくなります。
以下の例は【親Widgetが幅・高さ指定なしの場合】【親Widgetの幅・高さがConstrainedBoxに囲まれた子WidgetのSizeよりも小さい場合】
Text(".loose 幅・高さの最大値を指定"),
ConstrainedBox(
  constraints: BoxConstraints.loose(Size(100.0, 30.0)),
  child: Container(
    color: Colors.grey,
  ),
),

Text(".loose 幅・高さの最大値を指定 親Widgetの幅が狭い場合"),
SizedBox(
  width: 80.0,
  height: 20.0,
  child: ConstrainedBox(
    constraints: BoxConstraints.loose(Size(100.0, 30.0)),
    child: Container(
      color: Colors.grey,
    ),
  ),
),
Constrains.tight
tight は、幅・高さを絶対値指定することができます。
/// tight
Text(".tight 幅・高さの絶対値を指定"),
ConstrainedBox(
  constraints: BoxConstraints.tight(Size(100.0, 30.0)),
  child: Container(
    color: Colors.grey,
  ),
),
Constrains.tightFor
tightForは幅・高さの設定した方のみ絶対値指定することができます。
/// tightFor
Text(".tightFor 選択したものの絶対値を指定"),
ConstrainedBox(
  constraints: BoxConstraints.tightFor(height: 10.0),
  child: Container(
    color: Colors.grey,
  ),
),
Constrains.tightForFinite
tightForFiniteは、無限の場合を除き、tightForは幅・高さの設定した方のみ絶対値指定することができます。
正直、これとtightForの使いみちの違いがまだよくわかっていません。
/// tightForFinite
Text(".tightForFinite 選択したものの絶対値を指定"),
ConstrainedBox(
  constraints: BoxConstraints.tightForFinite(
    height: 10.0,
  ),
  child: Container(
    color: Colors.grey,
  ),
),
全ソースコード
import 'package:flutter/material.dart';

void main() => runApp(MyApp());

class MyApp extends StatelessWidget {
  // This widget is the root of your application.
  @override
  Widget build(BuildContext context) {
    return MaterialApp(
      title: 'Flutter Demo',
      theme: ThemeData(
        primarySwatch: Colors.blue,
      ),
      home: MyHomePage(title: 'Flutter Demo Home Page'),
    );
  }
}

class MyHomePage extends StatefulWidget {
  MyHomePage({Key key, this.title}) : super(key: key);

  final String title;

  @override
  _MyHomePageState createState() => _MyHomePageState();
}

class _MyHomePageState extends State<MyHomePage> {
  @override
  Widget build(BuildContext context) {
    return Scaffold(
      appBar: AppBar(
        title: Text(widget.title),
      ),
      body: Column(
        mainAxisSize: MainAxisSize.min,
        mainAxisAlignment: MainAxisAlignment.start,
        crossAxisAlignment: CrossAxisAlignment.center,
        children: <Widget>[
          /// expand
          Text(".expand 高さのみ指定"),
          ConstrainedBox(
            constraints: BoxConstraints.expand(height: 30.0),
            child: Container(
              color: Colors.grey,
            ),
          ),
          SizedBox(height: 20.0),
          Text(".expand 高さ・横幅も指定"),
          ConstrainedBox(
            constraints: BoxConstraints.expand(height: 30.0, width: 100.0),
            child: Container(
              color: Colors.grey,
            ),
          ),
          SizedBox(height: 20.0),

          /// loose
          Text(".loose 幅・高さの最大値を指定"),
          ConstrainedBox(
            constraints: BoxConstraints.loose(Size(100.0, 30.0)),
            child: Container(
              color: Colors.grey,
            ),
          ),
          SizedBox(height: 20.0),

          Text(".loose 幅・高さの最大値を指定 親Widgetの幅が狭い場合"),
          SizedBox(
            width: 80.0,
            height: 20.0,
            child: ConstrainedBox(
              constraints: BoxConstraints.loose(Size(100.0, 30.0)),
              child: Container(
                color: Colors.grey,
              ),
            ),
          ),
          SizedBox(height: 20.0),

          /// tight
          Text(".tight 幅・高さの絶対値を指定"),
          ConstrainedBox(
            constraints: BoxConstraints.tight(Size(100.0, 30.0)),
            child: Container(
              color: Colors.grey,
            ),
          ),
          SizedBox(height: 20.0),

          /// tightFor
          Text(".tightFor 選択したものの絶対値を指定"),
          ConstrainedBox(
            constraints: BoxConstraints.tightFor(height: 10.0),
            child: Container(
              color: Colors.grey,
            ),
          ),
          SizedBox(height: 20.0),

          /// tightForFinite
          Text(".tightForFinite 選択したものの絶対値を指定"),
          ConstrainedBox(
            constraints: BoxConstraints.tightForFinite(
              height: 10.0,
            ),
            child: Container(
              color: Colors.grey,
            ),
          ),
          SizedBox(height: 20.0),
        ],
      ),
    );
  }
}
まとめ
本記事では、Widgetの幅・高さを調整することができるConstrainedBoxについて紹介しました。
このWidgetについて解説したFlutter公式ドキュメントは以下になります。

